Nuxt 3 + Storyblok for a Sushi Recipes Website
What happens when you combine the versatility of the NuxtJS Framework with a top-notch headless CMS solution like Storyblok?
The result is a sparkling website with a ridiculously easy content editing experience that deploys seamlessly on your cloud infrastructure of choice. Sounds amazing right?
In this article, we are going to learn how to combine both technologies using the Storyblok Nuxt module. The format of this post is going to be different than usual, we will go section by section checking the content of my last video along with the repository here.
# What the... is headless?
"Off with their heads!" said the Queen of Hearts! This phrase could come to your mind when thinking of headless, but it has a slightly different meaning (kinda) when we are talking about CMS solutions.
Do you remember those old, monolithic, self-hosted websites solutions where the BE (Back-end), the FE (Front-end), and the content were tightly coupled?
A Headless CMS is when the presentational layer or Front-end (a.k.a the "head") and it's entirely decoupled from the content repository and the BE system (a.k.a the "body")
With a content-first approach, users can author their content through an API and deliver it to any client app, could be a website, a mobile app, you name it.
Check the complete section here 00:38
# Storyblok
It's a leading technology in terms of headless CMS. What I personally like the most, is how easy is to change content, preview it and then deploy to production independently from tech stack you choose.
The developer and content experience are beautiful, something that is missing in most of the CMS out there.
For more info check here 01:22
# Content structures
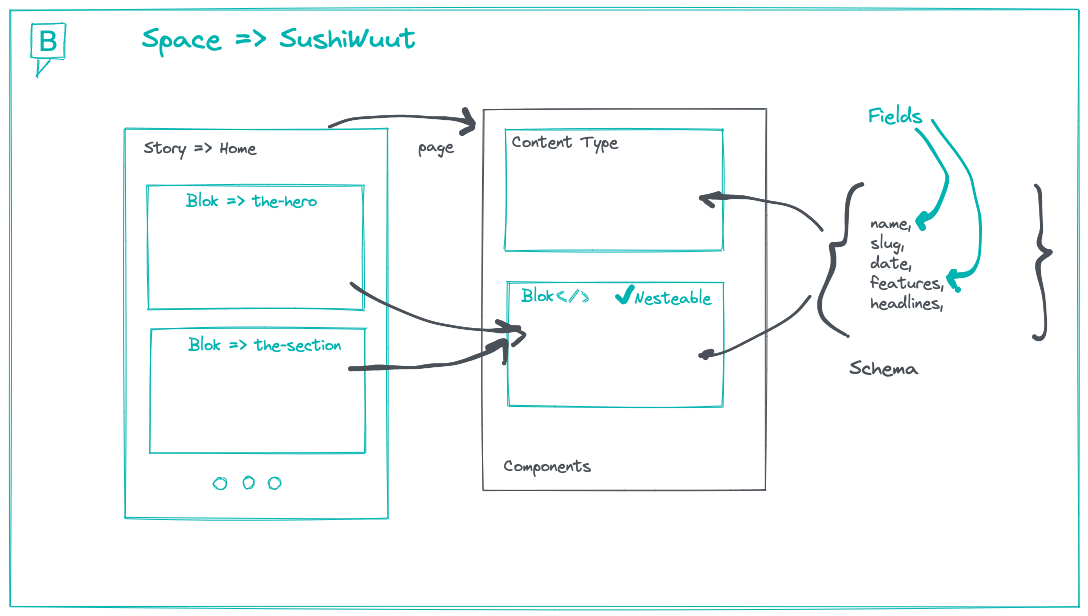
Storyblok's way of creating content objects is quite cool. Have you ever played with Legos? They use bloks to create bigger pieces and each blok has its own set of properties (like color, width, height, specific form). This CMS uses bloks that represent components (hero, features section etc) to create bigger pieces (Stories), were ****each blok has their own set of fields (called Schema) holding your content.

There is also another important concept, Content Types, which is another type of component that represents templates for your stories. Examples of common Content Types are Post, Product, Page etc**.**
For more detailed explanation, check here 23:22
# Installation
Let's create a new Nuxt project:
npx nuxi init name-of-your-project
Then we install the module:
yarn add -D @storyblok/nuxt@next axios
Check complete process here 05:08.
# Setting up your Storyblok space
First you will need to create your user if you haven't already at Storyblok, then login to enter the dashboard and you will see a call to action next to the welcome hero. Click on it "Create a new space"
I will not cover the whole Dashboard explanation, if you are interested, you can check it on the video here 02:56.
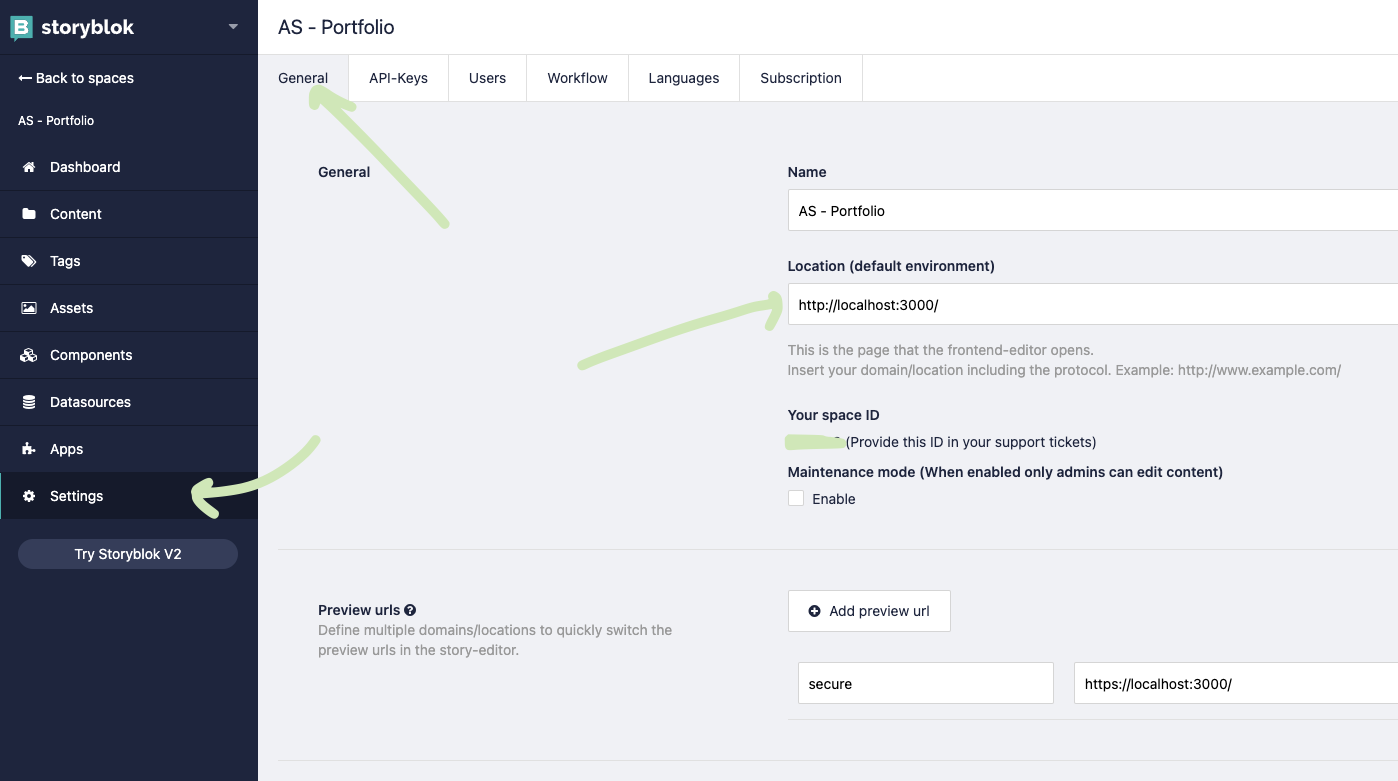
Before we continue, please go to Settings on the left sidebar, then General and where it says Location (default environment) add your localhost url, which on Nuxt is http://localhost:3000

Now to link our module we will need a key, so click on API-Keys and copy your personal key from the list. ⚠️ Please be careful not to share or save this in a public place or in the repository.
# Configuring the Nuxt module
Add the following code to the modules section of nuxt.config.ts and replace the accessToken with API token from Storyblok space.
import { defineNuxtConfig } from "nuxt3";

export default defineNuxtConfig({
  modules: [
    ["@storyblok/nuxt", { accessToken: "process.env.STORYBLOK_API_TOKEN" }]
    // ...
  ]
});
Safe tip here: you can create and .envfile and add there your key and the API Url
STORYBLOK_API_URL=https://api.storyblok.com/v2
STORYBLOK_API_TOKEN=xxxxxxxxxxxxxxxxxxxxxxxxxx
Make sure you don't commit the file to your repository.
As a final step, run yarn dev on the project to serve the Nuxt application and if all goes smooth you should see the <NuxtWelcome /> component.
For the complete explanation refer to this section of the video 10:18.
# Creating our first page
Now is when the magic begins! Open Content on the sidebar and it will display a list of all the pages available. By default, there is a Home page already included. Do you notice that the Content Type is Page? We're going need this on a moment., but for now click on the Home item.
Do you remember when we add the default environment to http://localhost:3000? Here is why: Storyblok allows you to see the preview of your page directly for the CMS. On the right-hand sidebar you will see all the configuration for the current page, including the Bloks.
# Page component on Nuxt
On your Nuxt application, create a component under /components named ThePage , which is responsible to render all our Stories and Bloks. This is connected to
<script lang="ts" setup>
const props = defineProps({
  blok: {
    type: Object,
    required: true,
  },
})
</script>

<template>
  <div v-editable="blok">
    <component
      :is="blok.component"
      v-for="blok in blok.body"
      :key="blok._id"
      :blok="blok"
    />
  </div>
</template>
Check here for the complete process 27:49
# Nuxt home route
Since Nuxt has already a Router, just create an pages/index.vue to edit your Home page, this will correspond with the / path.
<script lang="ts" setup>
...
</script>
<template>
  <component
    :is="state.story.content.component"
    :key="state.story.content._uid"
    :blok="state.story.content"
  />
</template>
Since Storyblok uses a JSON data structure like this on the request
{
    "story": {
        "name": "Home",
        "slug": "home",
        "full_slug": "home",
        "id": 10718480,
        "uuid": "74a92c75-dbb6-4cb6-8c2f-b4582017c087",
        "content": {
            "_uid": "c0c5fd8d-6913-4ebf-bbed-a60d5e83dc1f",
            "component": "the-page",
            "body": [
                ...
            ],
            ...
        },
        ...
    }
}
We will use dynamic components from Vue3 a lot. Why? You see that story.content.component: 'the-page' on the response? We will pass exactly that field on our component tag <component :is="story.content.component" /> so Nuxt knows which components are associated to the story and be able to render it. Genius I know.
Then we need to fetch that JSON right? For that we're going to add some composable functions on our <script>.
import { useStoryApi, useStoryBridge } from '@storyblok/nuxt/composables'

const storyapi = useStoryApi()

const { data } = await storyapi.get('cdn/stories/home', {
  version: 'draft',
})

const state = reactive({
  story: data.story,
})
We use the useStoryApi to fetch directly to Storyblok cdn, and get the content of our Story (Home). For now let's fetch the content on draft instance (check content versions here)
Now we need to tell our Nuxt app to listen to changes made on the CMS dashboard and update the content, for that we are gonna use useStoryBridge on the mounted hook.
onMounted(() => {
  useStoryBridge(state.story.id, event => {
    state.story = event
  })
})
Check here 31:41
#
# Creating Bloks (components)
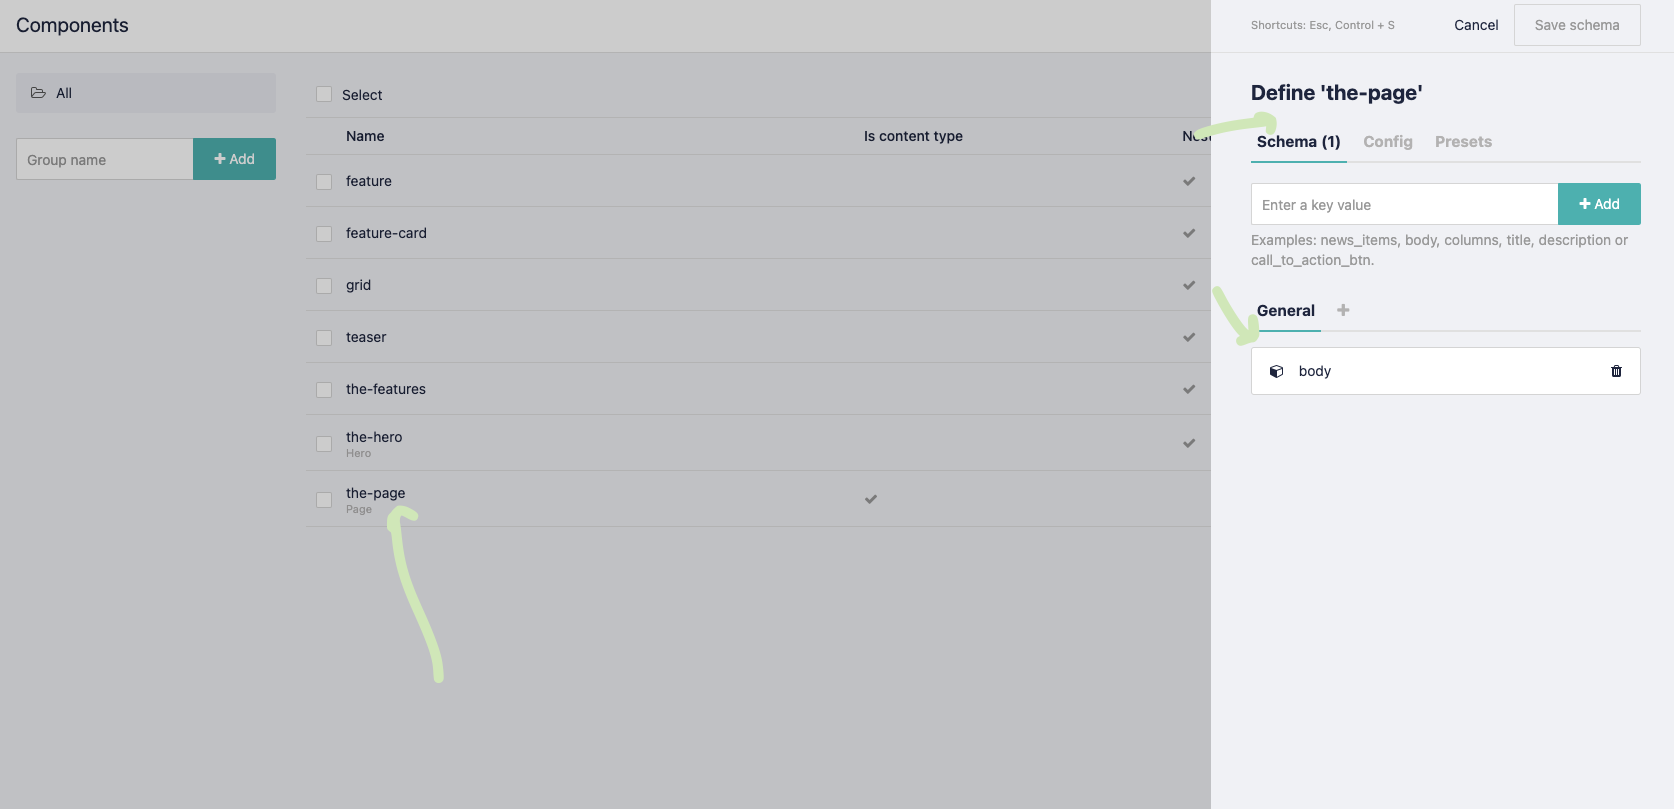
On the left sidebar go to Components, you will see a list of available ones (Storyblok gives you some default ones). Remember that we talk about the Page component which is a Content Type on the previous section? If you click on it you will be able to check it's Schema, which contains a field called body (check template of /components/ThePage.vue 😜 ) .
I will rename it to the-page to align with the name of the component on Nuxt, but by default is page.
Now click con New to create a Blok**,** give it a name (This name need to be kebab-case and the same as your Nuxt component to be able to render), I will call it the-hero 🦸🏻♀️ , make sure you check the Nestable checkbox before hitting Next.
On the tab Schema is where we are gonna define the properties to hold our content. since it's a Hero Component we will need:
- Headline
- Description
- CTA's
- Image
To add a new field just enter a key value and click the button + Add. By default it will create a simple Text Field, but if you click the field you can change its type (For more info check the Field Types docs).

# Hero component on Nuxt
Similar to our ThePage, we are gonna create another component called TheHero with the following code.
<script lang="ts" setup>
const props = defineProps({
  blok: {
    type: Object,
    required: true,
  },
})
</script>
<template>
  <section class="hero w-full py-16">
    <h1 class="font-display text-shrimp-400 font-extrabold text-3xl mb-12">
       {{ blok.headline }}
    </h1>
    ...
	</section>
</template>
All components need to have a prop called blok which is going to contain the actual component Schema from the JSON response done at page level.
To see the complete explanation + markup check the video at minute 34:30.
# Final result
Go back to your Home Story, on the right sidebar you will see a + Add block under the field label Body, click there and add your recently created component, once you do, click in it and add the content of each field you created before on the Schema.
If all went well (if not, you can always download the repo and that's it 😜) and you create your markup and style like in the video you should be able to see something like this:
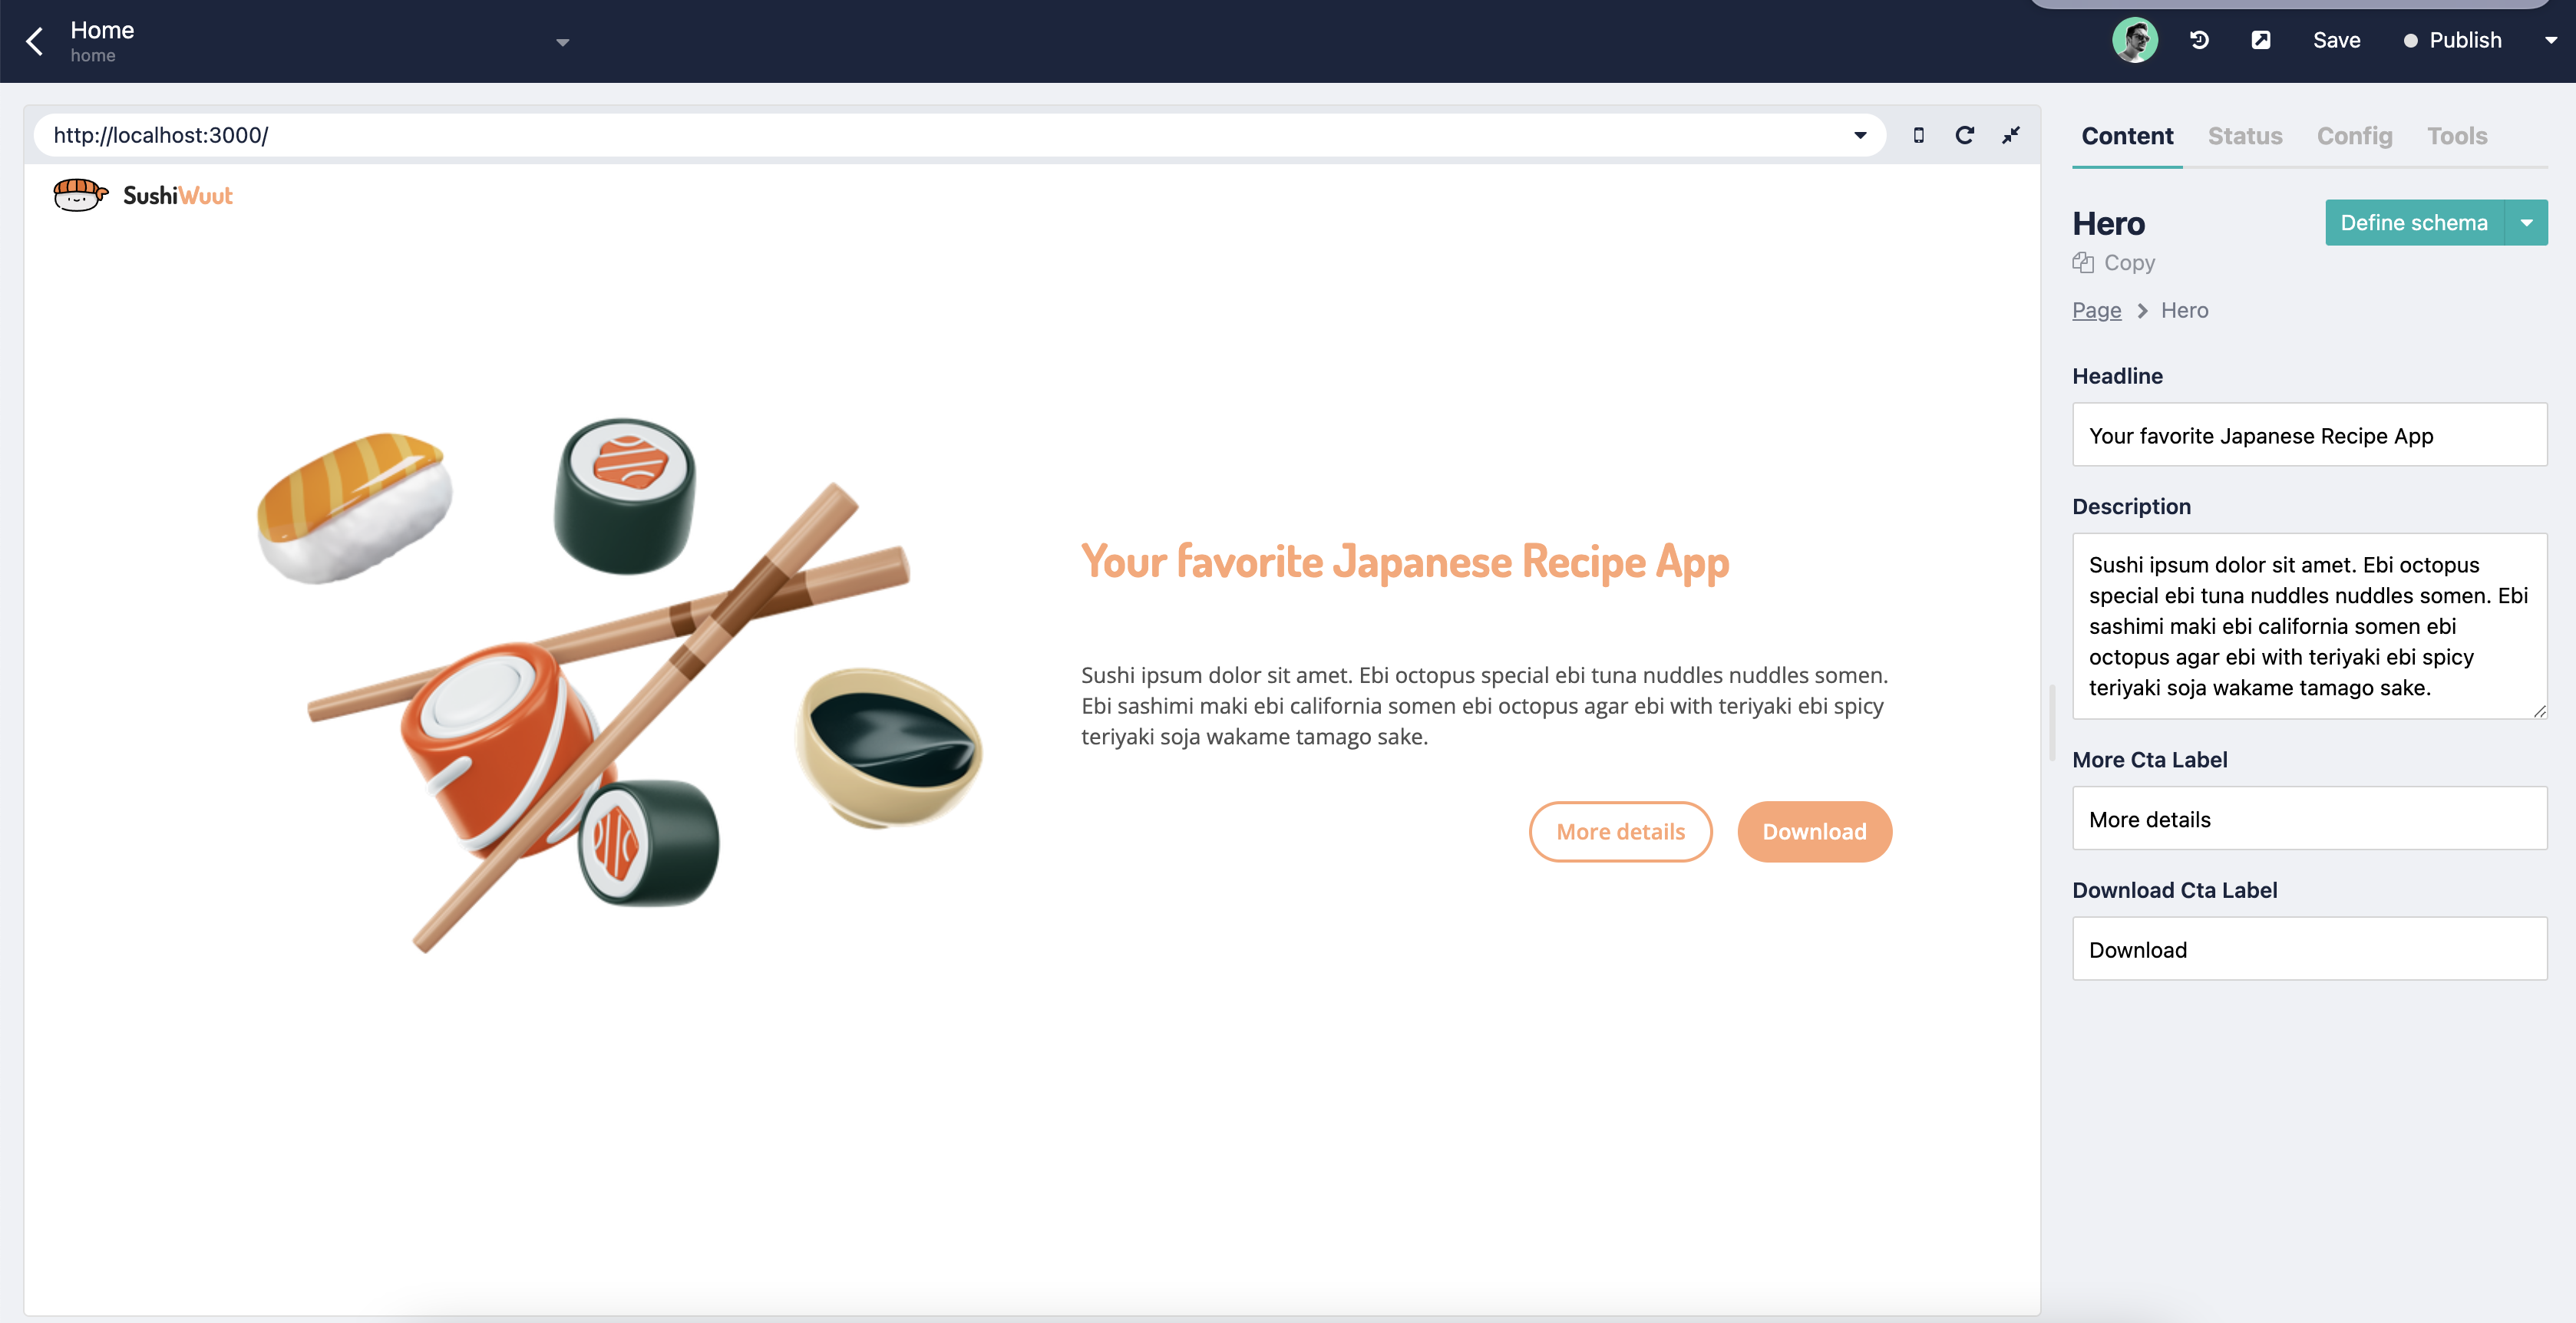
Try to edit something and see how it updates automatically on the Preview on the left. That's what I call real-time editing 😱.
# Wrap up
Storyblok + Nuxt3 is a powerful combination to deliver a modern and flexible CMS experience to your clients and developers. Some people say it's impossible to have them both happy at the same time. Well, now you can 😉
I hope you enjoyed the article + video. See you around
Happy coding!
Related Articles
Generate and deploy the blog as a full static Nuxt site
Your site is ready for the world. Wait, where and how do I publish it? You only need 5 minutes to learn how to deploy a Nuxt.js site in Netlify.
Aug 25, 2020
Optimize SEO and Social Media Sharing in a Nuxt blog
Do you want your blog to reach an audience? Then you should have SEO in your mind. Learn two techniques you can easily apply to your Nuxt blog.
Aug 18, 2020
The new Provide and Inject in Vue 3
Getting stuck into the prop drilling? Learn how provide/inject can make your components more flexible and independent in this short tutorial.
Jul 18, 2022
Sponsors
VueDose is proudly supported by its sponsors. If you enjoy it, consider supporting it to ensure the project maintainability.
Silver

Learning Partner
